How to draw roses and peonies with images
Table of Contents
Table of Contents
Drawing roses can be a challenging task for beginners, but with the right techniques and practice, anyone can learn how to draw beautiful roses step by step. In this post, we’ll guide you through the process of drawing roses, from the basic shape to the intricate details, so that you can create stunning rose illustrations.
The Pain Points of Drawing Roses
Many people struggle with drawing roses due to their intricacies and details. They may find it challenging to create a realistic-looking rose or may struggle with proportion and shading. Additionally, some may not know where to begin with the process, which can be overwhelming or frustrating.
How to Draw Roses Step by Step
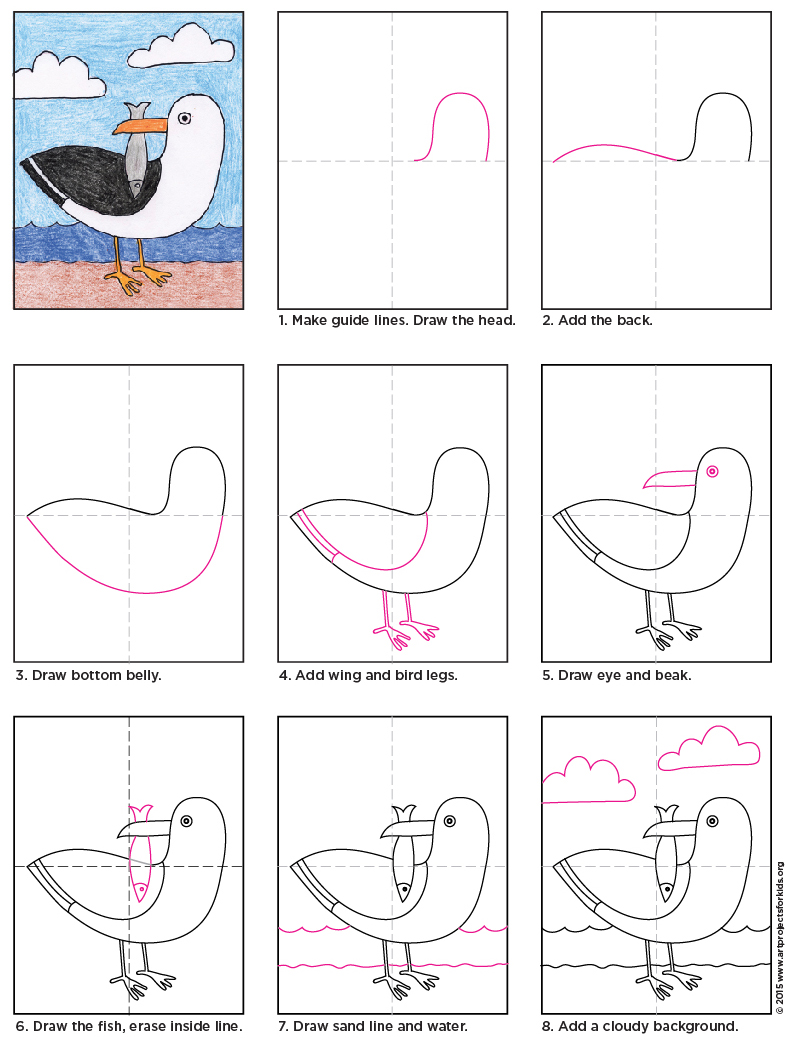
To start with how to draw roses step by step, it is essential to understand the basic shape of the rose. The first step is to draw a rough outline of the rose’s shape, starting with a small circle at the center and curving the lines outward to create the petals’ shape. Once the rough shape is established, fill in the petals with shading to create depth and texture.
Next, add the details such as the stem, leaves, and thorns. Using shading techniques, create a 3D effect on the petals so that they appear to be cupping each other. Continue adding layers of shading until the rose has the desired depth and texture.
Summary of Main Points
When it comes to how to draw roses step by step, it is essential to understand the basic shape and to use shading techniques to create depth and texture. Adding details such as the stem, leaves, and thorns will enhance the drawing further.
The Importance of Practice
While it may seem daunting, drawing roses can be a relaxing and rewarding activity. With practice, anyone can learn how to draw beautiful roses step by step. It takes time and dedication to improve your skills, but the end result is well worth it.
Start by drawing a rough outline, practicing your shading technique, and adding layers of depth and texture. The more you practice, the better you will become, and soon you’ll be able to create stunning rose illustrations that you can be proud of.
Using References to Improve Your Drawing Skills
One way to improve your skills is by using references. Look for images of roses, and study the details and shading techniques used in the illustrations. Pay attention to the petal’s shape and how they overlap, as well as the curvature of the stem and position of the leaves.
By replicating these elements in your drawing, you can improve the accuracy and realism of your rose illustrations. As you continue to practice using references, you will get better at replicating them and create your unique style.
The Benefits of Drawing Roses Step by Step
In conclusion, learning how to draw roses step by step can be a rewarding activity that helps you develop your artistic skills. With practice and dedication, you can create beautiful rose illustrations that you can be proud of. By using references and following our guide, you can improve your skills and create stunning rose illustrations. Get started today and see the benefits for yourself!
Question and Answer
Q: What is the most challenging part of drawing roses?
A: The most challenging part of drawing a rose is creating the depth and texture. It can be challenging to create the 3D effect on the petals, but with practice and patience, it can be done.
Q: How can I make my rose illustrations more realistic?
A: One way to make your rose illustrations more realistic is by studying references and paying attention to the details. Look for images of roses and notice the curves of the petals, the position of the leaves, and the shading techniques used.
Q: Can I draw a rose without shading?
A: Yes, you can draw a rose without shading. However, adding shading can create depth and texture, making your drawing more realistic looking.
Q: How long does it take to learn how to draw roses step by step?
A: The amount of time it takes to learn how to draw roses step by step varies from person to person. Some may take a few weeks, while others may take months or even years to master the technique. The key is to practice regularly and be patient with yourself.
Conclusion of How to Draw Roses Step by Step
Drawing roses step by step can be challenging, but with practice and dedication, anyone can learn how to create stunning rose illustrations. Remember to start with the basic shape, use shading techniques to create depth and texture, and add details such as the stem, leaves, and thorns. By using references and practicing regularly, you can improve your skills and develop your unique style. Get started today and see the benefits for yourself!
Gallery
How To Draw Roses - Happy Family Art

Photo Credit by: bing.com / step draw rose drawing roses flower tutorial sketch open flowers drawings different tutorials happy sketches happyfamilyart easy learn realistic instructions
Art Projects For Kids | Teacher-tested Art Projects

Photo Credit by: bing.com / draw rose drawing roses kids projects valentine step steps flower easy simple mothers beginners feeling interest bring thought upcoming so
Step By Step Drawing Of How To Draw A Rose (With Images) | Rose Drawing
 | Rose drawing")
Photo Credit by: bing.com / skiptomylou
DARYL HOBSON ARTWORK: How To Draw A Rose: Step By Step

Photo Credit by: bing.com / step rose draw drawing roses steps drawings flower simple flowers easy beginners hobson daryl artwork cute rosa
How To Draw Roses And Peonies (With Images) | Roses Drawing, Flower
 | Roses drawing, Flower")
Photo Credit by: bing.com / draw roses drawing flower rose step easy steps simple imgur tutorial drawings